I’ve had readers requesting this recipe for a while now, so firstly…sorry it’s taken us so long to post this! We’ve been waiting for Chinese New Year to make this srispy stuffed lotus root recipe, at a time when they are available in abundance at your local Asian markets. These tasty little fried meat sandwiches are deliciously savory, crispy, and crunchy.
I remember eating this for Chinese New Year when I was little. It was a special dish, because in those days, fried foods were only made during special occasions. Oil was very expensive and also required special oil stamps. That was China in the 70’s and 80’s. Pretty much any day-to-day household product required stamps (as well as money) to buy. There were coal stamps, cotton stamps, tofu stamps, grain stamps, etc. If you wanted to buy a 10 pound bag of rice, for instance, you’d need to give the cashier money, as well as a certain number of 粮票 (grain stamps). The number of stamps for each category was assigned based on family size and family members’ ages.
I’m starting to sound like a raving old lady, but I’m glad that those days are long gone and those stamps have become nothing more than collectibles. So go ahead and make this dish any time you want! As long as the fresh lotus roots are available, live large!
Aside from the fact that this stuffed lotus root recipe is really delicious and tasty, I should also say that it is a bit labor intensive. You’ll have to trim and cut the lotus roots, mix the meat filling, assemble, and, lastly, double-fry them. So I’m expecting all of you hard-core Chinese food devotees out there to roll up your sleeves with this one!

Now let’s give it a go!
Recipe Instructions
Stuffed Lotus Root Step 1: Make the meat filling
Put all of the meat filling ingredients (ground pork (or ground chicken), Shaoxing wine, light soy sauce (生抽), water, sesame oil, cornstarch, white pepper, scallion, and ginger) in a mixing bowl. Stir in one direction for about 5-10 minutes until the meat mixture becomes a very sticky paste. Set it aside.
Stuffed Lotus Root Step 2: Assembly
Before we start, let me demystify how to cut the lotus root. The “proper” way is the cut the lotus root into ¼-inch thick pieces. Then, you slice it right in the middle but not all the way through, so the two parts are still attached. The goal is to create a “clam shell,” so the whole thing stays intact, even after frying.
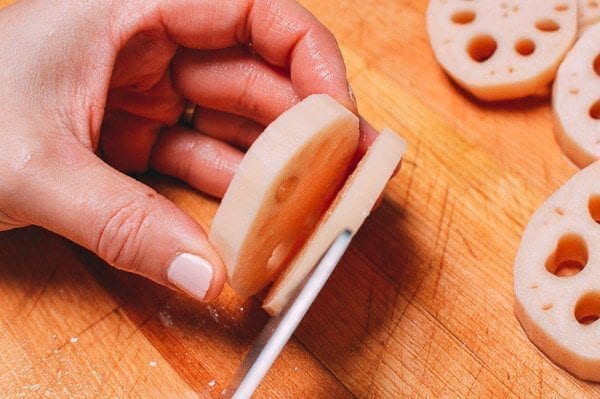

I found it to be quite difficult, because the lotus root breaks easily (it’s crunchy when raw, similar to a potato). I succeeded with some, but for the broken pieces, I just sandwiched them together with the meat filling. As long as the meat filling is prepared correctly, the “sandwich” should not fall apart during frying. So we’re going to go with the easier method of just slicing the lotus roots all the way through.
Peel, wash, and cut the fresh lotus roots into 1/8-inch slices. Rinse the lotus root slices in cold water to wash away excess starch and so they don’t turn black (again, they’re similar to potatoes). Drain. It’s best to spin them in a salad spinner to get rid of all the excess water.
Take one slice, and spread on a thin layer of meat filling. Top it with another slice of lotus root to create a sandwich. Gently press the two slices together so the meat filling fills the holes of the lotus root on both sides This step will “lock” the two slices together. Repeat until you’ve used all of the slices. You should be able to make about 15-18 pieces.

Stuffed Lotus Root Step 3: Make the batter
Add both the all purpose flour and the sweet rice flour, salt, and five-spice powder to a mixing bowl. Slowly add the water, stirring constantly. Stir thoroughly until any lumps have dissolved. Then stir in the beer. This batter is pretty light. You can thicken it by adding a bit more flour if you like a heavier batter. Also, stir the batter between dipping each lotus root piece, as sweet rice flour tends to settle quickly.
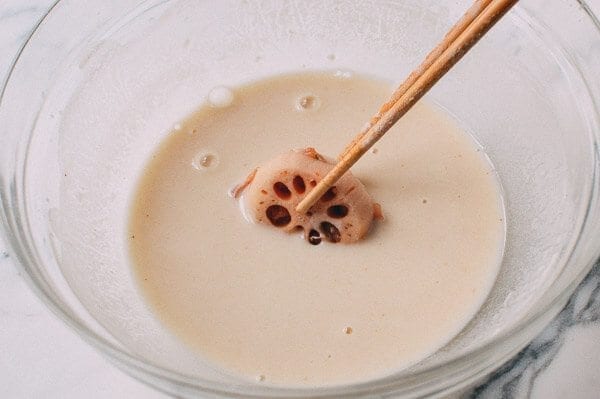
(Don’t coat the lotus roots until right before frying. If too much liquid gets in between the meat and the lotus roots by coating too early, they will fall apart in your pot of oil.) Speaking of which…
Stuffed Lotus Root Step 4: Frying
Now it’s time to prepare the oil for frying. I like to use a small, deep pot because it requires less oil and its depth helps contain the oil, avoiding splatters and burns.
Fill the pot about 1.5” deep with oil, and heat it to 275 degrees. Once the oil reaches 275 degrees, coat the lotus in the batter and slowly lower into the oil. Fry a few pieces at a time, frying each side for about 6 – 7 minutes. Take them out and set them aside on a plate lined with a paper towel. Repeat until all the lotus sandwiches are fried.

Now turn up the heat to bring the oil up to 325 degrees. Re-fry each piece for 3 minutes to really get the color and crunchiness that we are looking for.

Enjoy these crispy stuffed lotus root treats with the leftover beer from making the batter. Bill did!

I think I know why most restaurants in the US don’t offer this dish. It’s a lot of work! This stuffed lotus root dish is truly a labor of love, and I know it will help bring back a lot of memories for many of you! Cheers!


Crispy Stuffed Lotus Root with Pork

Ingredients
You'll need:
- 1½ pounds fresh lotus roots (680g)
- Oil (for frying)
For the meat filling:
- ¾ pound ground pork (340g; can substitute ground chicken)
- 1 tablespoon Shaoxing wine
- 2 tablespoons light soy sauce
- 1/4 cup water (60 ml)
- 2 teaspoons sesame oil
- 1 teaspoon cornstarch
- ¼ teaspoon white pepper
- 1 scallion (very finely chopped)
- 2 slices ginger (finely minced)
For the batter:
- ¼ cup all-purpose flour (30g)
- ¼ cup sweet rice flour (30g; can substitute cornstarch)
- ½ teaspoon salt
- ¼ teaspoon five-spice powder
- 1/3 cup water (80 ml)
- ¼ cup beer (of your choice)
Instructions
- Step 1: Make the meat filling
- Put all of the meat filling ingredients in a mixing bowl. Stir in one direction for about 5-10 minutes until the meat mixture becomes a very sticky paste. Set it aside.
- Step 2: Assembly
- Peel, wash, and cut the lotus roots into 1/8-inch slices. Rinse the lotus root slices in cold water to wash away excess starch and so they don’t turn black (again, they're similar to potatoes). Drain. It’s best to spin them in a salad spinner to get rid of all the excess water.
- Take one slice, and spread on a thin layer of meat filling. Top it with another slice of lotus root to create a sandwich. Gently press the two slices together so the meat filling fills the holes of the lotus root on both sides This step will “lock” the two slices together. Repeat until you've used all of the slices. You should be able to make about 15-18 pieces.
- Step 3: Make the batter
- Add both flours, salt and the five-spice powder to a mixing bowl. Slowly add the water, stirring constantly. Stir thoroughly until any lumps have dissolved. Then stir in the beer. This batter is pretty light. You can thicken it by adding a bit more flour if you like a heavier batter. Also, stir the batter between dipping each lotus root piece, as sweet rice flour tends to settle quickly.
- (Don’t coat the lotus roots until right before frying. If too much liquid gets in between the meat and the lotus roots by coating too early, they will fall apart in your pot of oil.) Speaking of which...
- Step 4: Frying
- Now it’s time to prepare the oil for frying. I like to use a small, deep pot because it requires less oil and its depth helps contain the oil, avoiding splatters and burns.
- Fill the pot about 1.5” deep with oil, and heat it to 275 degrees. Once the oil reaches 275 degrees, coat the lotus in the batter and slowly lower into the oil. Fry a few pieces at a time, frying each side for about 6 – 7 minutes. Take them out and set them aside on a plate lined with a paper towel. Repeat until all the lotus sandwiches are fried. Now turn up the heat to bring the oil up to 325 degrees. Re-fry each piece for 3 minutes to really get the color and crunchiness that we are looking for.
Tips & Notes:
nutrition facts